The challenges of winter roofing
by nithya_caleb | January 22, 2019 11:43 am
by Ted Katsoris and Derrick Moore
 [1]
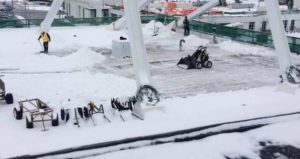
[1]It never fails. Around October and November, many consulting firms will get calls from clients asking them to design a new roof for immediate replacement, often due to either building problems or new tenant or lease demands. This could be an absolute necessity, depending on the severity of leaks and the interior environment the roof is supposed to protect. Contingent on the size of the roof, its complexity, and contractor availability, there may be time to squeeze in the replacement before the snow falls. Of course, one would hope with regular maintenance and proper capital planning, winter-weather roof replacement could be avoided. However, hope is not always a successful strategy.
This is not to say roofing cannot be performed during the colder months. However, there are many challenges posed to winter roofing work that must be addressed by designers, contractors, and owners, which are not present during the warmer construction season. These difficulties can be further amplified when reroofing over an occupied facility, whereas with new construction, the risks to the interior are generally not as critical.
When real Canadian winter-weather conditions (such as low temperatures, freezing rain, and wet and heavy snow) begin will vary depending on location. These Torontonian authors recall asking a property manager in Kapuskasing, Ont., “When does it start to snow up here?” He replied snow could start falling as early as October. A quick check of Environment Canada records[2] confirmed the average October snowfall in Kapuskasing is 215 mm (8 ½ in.). When the final roof review was completed a few months later, it was a balmy –22 C (–7.6 F) at the project site.
For the purposes of this article, one should assume ‘winter roofing’ falls between November and late March. Although this timeframe varies across Canada, the general topics presented here are typical considerations that should be addressed in the decision-making process of when to begin/continue roofing and when to stop until the weather improves enough to facilitate good roofing conditions.
The approach
 [3]
[3]Is this a new build or a replacement of an existing roof assembly on an occupied building? Although many of the items to be discussed are relevant to both new and replacement operations, reroofing over an existing building in the wintertime poses a greater challenge. This is particularly true if the building is a data centre, transformer station, hospital, long-term care facility or seniors’ residence, airport, manufacturing facility, or similar, where any form of water leakage can have significant implications for building users and operators.
With new construction, roofing contractors are less concerned with water damage to the interior of the building. Installation of the roof usually starts right after the roof deck has been installed, as the general contractor (GC) intends to make the building watertight as quickly as possible. A typical day for a crew on the installation of a new roof would involve preparing the deck and then beginning to install the new assembly. Should the weather turn, crews can easily stop production and strive to make any exposed material and transitions watertight.
Reroofing crews face greater challenges. To ensure the roof remains watertight through the construction period, they should only be removing as much material as can be reinstalled in a day, with temporary seals then made at transition points. Assuming the new vapour barrier has waterproofing properties, the project team may also decide to fully remove the existing assembly and use the new vapour barrier as a temporary water barrier while they remove the balance of the roof. This approach has the bonus of increasing the amount of roofing material that can be removed in a day. It also helps minimize the clutter on the roof—since they are only replacing up to the vapour barrier, as opposed to the entire assembly, fewer materials are on the roof during the reroofing.
Regardless, there may be prolonged periods of adverse winter weather putting greater strain on those temporary seals to keep the building watertight. Typically, these seals are not as durable as the completed roof and could expose the building interior to water damage through tearing. Additionally, when the deck is temporarily uninsulated, thermal comfort may have to be addressed, as will the increased risk of condensation on the underside of the deck in occupied conditioned buildings. Depending on the building requirements, this may require temporary tarping, heating, and ventilation.
The complexity of the building design, ease of access to the roof, available space for materials and equipment, and the occupancy inside the building factor into the decision-making matrix. Further, the building’s HVAC system must be considered, particularly if units are being disconnected for a prolonged period of time to facilitate reroofing. This factor is discussed in more detail in the ‘Weather’ section later in this article.
Roof assembly limitations
 [4]
[4]A roof assembly can consist of many different components, including but not limited to the vapour barrier, insulation, cover and overlay boards, membrane, and surfacing/ultraviolet (UV) protection. In order to achieve good results, all these components must be properly installed.
Assemblies can be put together using various methods and techniques. For example, vapour barriers can be installed loose-laid or by using hot asphalt, cold-applied adhesives, or self-adhering membranes. Similarly, the insulation can be installed using mechanical fasteners or glues or mopped in place with hot asphalt. Mechanical fastening is not inherently temperature sensitive, but the sealing of membrane terminations and laps may be difficult to complete. There are also situations in which electrical conduits are secured to the underside of the steel deck, where mechanical fastening may pose a risk of puncturing conduits.
Finally, the membranes can be glued over the coverboards or insulation, mopped with hot asphalt, mechanically fastened, or (assuming the appropriate noncombustible substrates exist) torched in place.
The designer/contractor and the owner need to understand the limitations of various assemblies—especially the materials comprising them—in the weather conditions anticipated during installation. For instance, chemical adhesives for insulation layers and some self-adhering membranes have strict limitations on installation temperature. The use of hot asphalt is generally considered one of the most versatile options available when it comes to the installation of a roofing assembly in cold conditions. However, like all systems, this has limitations. For one, hot asphalt roofing systems require available, clear ground area for kettle setup, as the kettle generally cannot be placed on the roof. Their use is further limited to the height the liquid asphalt can be pumped or shuttled to the roof. This can pose a challenge when working in a built-up environment (e.g. city core) or on very tall buildings.
Compounding these limitations is the asphalt’s rate of cooling as it is transferred from the kettle to the roof. Low temperatures cool asphalt rapidly and crews have to work very quickly to apply it before it drops below its required application temperatures. The contractor may try to overheat the asphalt at the kettle to combat this, but if the asphalt’s temperature is raised beyond the recommended level, the quality of the asphalt will be compromised (reducing the service life of the roof) and the risk of kettle fires will increase. Moreover, asphalt has a strong odour, which may be objected to by the building users.
Cold-applied adhesives have the benefits of requiring limited storage space, offering easy handling, and being relatively odour-free. However, some cold adhesives take longer to install and cure compared to hot systems. Also, cold systems have strict manufacturer limitations on allowable temperature range before performance and manufacturers’ warranties are threatened. Many adhesives have storage and application temperatures above 4 to 5 C (39 to 41 F). Although installation temperature requirements vary from one manufacturer to another, there are few adhesives that can be used for below-freezing conditions, which may require special equipment to facilitate installation. The manufacturer should always be consulted for installation requirements, particularly when using products in cold-weather applications.
Some projects may require more environmentally friendly options low in volatile organic compounds (VOCs). However, being water-based/moisture-cured, these adhesives typically have more stringent temperature limitations (above 5 C) for application and cure periods.
As with adhesives, self-adhering membranes have temperature limits with respect to storage and installation. While some are restricted to a minimum installation temperature of 5 to 10 C (41 to 50 F), winter-grade self-adhering membranes may be installed at temperatures as low as –5 C (23 F). In theory, this sounds great, but what happens when the daily high is –7 C (19 F)? Should the team push to install the cold-weather membrane anyway? If the membrane is installed at –7 C (19 F), what about when the temperatures drop to –9 C (16 F)?
Manufacturers have strict protocols pertaining to the storage and installation temperatures (substrate, product, and ambient air temperatures, during and after) for their respective products and may require adhesives and membranes to be stored indoors or within heated/insulated containers (typically located onsite).
Pushing beyond temperature installation limits will happen, particularly when one considers schedule (work must be completed by a given time), onset of weather (the push to install the before the cold and snow really sets in), and the tried and true (when the team has pushed to those temperature levels before).
Many membranes need to be laid out in advance to properly relax before installation, and when membranes are colder, they become stiffer. Smooth-surfaced membranes become dangerously slippery when wet or icy, a factor that must be considered for worker health and safety. Single-ply membranes may also be more prone to damage from shovelling snow.
Weather
 [5]
[5]Understanding the weather conditions at the place of the work is critical in deciding when to start or temporarily stop roofing operations. It can be a bit of a costly guessing game. During the winter, design/construction professionals are faced with prolonged periods of rain, extreme cold, wet snow, ice, and cold winds, which can pose a significant challenge to the project schedule and budget, as well as the patience of all parties.
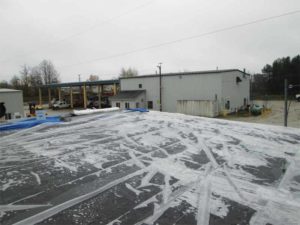
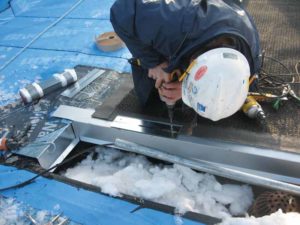
Product manufacturers typically require underlying surfaces to be free of debris and moisture (e.g. water, frost, snow, and ice). Who takes care of snow and ice removal prior to and during construction activities is a critical decision. Contractors must be allowed to properly carry additional costs if this work is to be done by their forces. If snow removal is to be completed by the owner’s team, this poses additional challenges, as the owner may be deemed the constructor of the project, meaning responsibility for site safety shifts from the contractor to the owner.
Contractors may dispose of a light amount of snow by either sweeping or shovelling it away from the work area. If the building is noncombustible, they may decide to use an open-flame torch to melt the snow/ice and dry the roof. Cleaning snow off a concrete deck is relatively easy, as it is just like shovelling the driveway, but on a steel deck, the contractor has to clean the lower flutes, which is an extremely tedious and time-consuming task that may take several hours to complete. Further, quality and durability issues can surface with the roof system if the substrates are not adequately dried. For example, blisters may form or adhesion could be compromised.
Snow removal is as expensive as it is labour intensive. It can take three or four roofers out of a typical six-person crew to undertake this task, and more if the snowfall is heavy. If the requirements for snow management are not factored into the contract documents, then the owner will likely be exposed to additional charges for snow removal.
In these authors’ experience, the typical labour costs of a unionized roofing crew of six (within a 100-km [60-mi] radius of home base) is in the range of $5000 to $6000 per day. Therefore, the question becomes, “Should the roofing crew remove some snow to do a little bit of roofing only to repeat the work a few days later, after it snows again?”
This is a difficult decision to make. For example, if there is only a day or two left to complete the project, the team may consider spending this amount and finishing the work. Alternatively, if the team is about to start a new section, the work may be halted until the weather improves. Finally, depending on the project delivery schedule, operating requirements, and budgeting limitations, the team may be forced to take the least palatable option, which is to accept the risks and work through the winter.
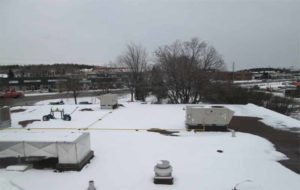
Roofing work could also impact mechanical systems, which may need to be temporarily turned off to avoid drawing in odours and dust. Having the heating system down during below-freezing temperatures will have a definite impact on occupant comfort. Usually, sequencing the downtime of units will be required or temporary heat may be necessary to maintain interior comfort for tenants.
These considerations must be made in the early stages of the project so adequate planning can be incorporated into the design.
 [6]
[6]Image courtesy Environment Canada
The human factor
It is cold, wet, and slippery on the roof. During the cold months, light summer clothing is replaced with dreaded “winter weight.” For roofing crews, this means long underwear, heavy sweaters, winter jackets, double gloves, wool hats, heavy wool socks, and more. This can represent an additional 13.6 kg (30 lb) of clothing, significantly slowing movement around the roof.
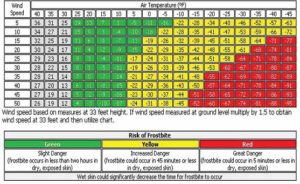
Irrespective of how well the crew is dressed, the cold plays a significant role in roofing as workers may face the risk of frostbite to fingers, toes, noses, and earlobes, as well as hypothermia, when working in extreme temperatures. According to the Canadian Center for Occupational Health and Safety (CCOHS), the risk of moderate frostbite can occur between a wind chill of –10 and –27 C (14 and –16.6 F). Figure 1 illustrates the exposure risk as it relates to ambient temperature and wind.
In the preparation of the contract documents, consideration should be given to the question of whether the crews can use the owner’s facility for warm breaks and storage or whether the contractor has to provide onsite heated storage containers.
Working over the winter months will also have an impact on crews’ overall productivity and on the project schedule. In these authors’ experience, depending on the type of roof and rooftop equipment, production can decrease by 20 per cent or, in some instances, more. This can be attributed to the need for additional site/deck preparation, temporary heating, storage, and additional material handling, as well as the weather. Additionally, there is only so much daylight available in the winter. During the summer, crews can have up to six additional working hours while the sun is out (Figure 2). The winter days are shorter and depending on where the project is located, it may start to get dark as early as 4:00 p.m. This is especially true once the clocks are turned back to standard time.
Schedule (design/tender and construction)
 [7]
[7]Image courtesy Timebie.com
Contractors typically cannot start a project right away, and a properly designed and detailed new roof system is of the utmost importance. A key underlying factor in the preparation of a reroofing project is the development of the tender and design documents. During this process, the designer works closely with the owner to determine the best roof design for the building while meeting the owner’s requirements and project budget. For example, owners may restrict use of asphalt-based products or mechanical fasteners due to conduits or services on the underside of the deck. They may also have personal biases against specific assemblies and manufacturers they do not wish to use. The design professional must navigate these factors in the preparation of the design. Depending on the client’s review and approval process, this phase of the project could take as long as eight to 10 weeks to complete.
Once the design is ready, the project must be tendered and awarded. The typical tender period varies based on the client’s process. For private clients, it can be as short as three to four weeks (two weeks to tender and one to two to award a contract). For others, it can take much longer. Public clients, for example, have regimented tendering and award processes, which can take up the full 60- to 90-day period of irrevocability (i.e. the amount of time the bids remain open) before the acceptance of the bid by purchasing, council, or similar. This is in addition to the two- to four-week tender period.
Once awarded, contractors must schedule this work within their production schedules. If a contract is awarded late in the construction season, it may take anywhere from four to six weeks for contractor mobilization to occur. As winter comes, contractors will also likely have other existing project commitments that are also weather dependent. Depending on available forces, this can further defer the start on a new site.
The speed of construction varies based on elements such as location, access, obstructions, services, and roof assembly type. For new construction, roofing crews can move relatively quickly, as they do not have any removals to contend with. However, on reroofing operations, crews are only able to remove as much of an area as they can make watertight. Again depending on the aforementioned factors, a crew of six may only be able to remove and replace an average of 15 squares a day where one square equals 9.3 m2 (100 sf). Therefore, from the time the request is made to design a new roof, it may take approximately 19 to 24 weeks from the start of the project (i.e. design) to completion.
In these authors’ experience, if the project does not need to be rushed, better pricing can be obtained by designing the work in the fall and early winter and tendering at the beginning of the year as contractors line up projects for the upcoming construction season. This is usually the right decision for quality, schedule, cost, and roof system flexibility.
Conclusion
The intent of this article is not to dissuade design/construction professionals from doing a roofing project over the winter. However, one must be aware of the additional challenges, schedule implications, and costs. It can be done, and these authors’ firm has been involved in many successful roofing projects carried out over the winter. Similarly, the team has also been in situations where, in consultation with the client and contractor, work has stopped until weather conditions improve to ensure the final product is not compromised. This is not an ideal situation, as it leaves the owner with a partially completed building. However, if the team, working together with the owner, determines the risks are too great, then the right decision may be to hold off on roofing until warmer weather arrives.
 [8]Ted Katsoris is a practice lead in the Building Science Group of Building Specialty Services at Morrison Hershfield’s Markham, Ont., office. Since joining Morrison Hershfield in 2004, Katsoris has overseen more than 800 projects. He brings more than 30 years of combined contracting and consulting experience to any project he undertakes. Katsoris also has extensive experience in the fields of building science and building envelope repair/rehabilitation, as well as contract administration. He can be reached via e-mail at tkatsoris@morrisonhershfield.com[9].
 [10]Derrick Moore is a principal and senior building science consultant for the Building Specialty Services Group at Morrison Hershfield. Moore project manages and is actively involved as a building science consultant on a wide variety of building envelope assessment and restoration projects. E-mail dmoore@morrisonhershfield.com[11] for more.
- [Image]: https://www.constructioncanada.net/wp-content/uploads/2019/01/File-Opener.jpg
- records: http://www.eldoradoweather.com/canada/climate2/Kapuskasing.html
- [Image]: https://www.constructioncanada.net/wp-content/uploads/2019/01/Tarping-of-roof.jpg
- [Image]: https://www.constructioncanada.net/wp-content/uploads/2019/01/Disconnecting-roof-top-units-during-winter-work-may-have-a-negative-imp....jpg
- [Image]: https://www.constructioncanada.net/wp-content/uploads/2019/01/Working-around-snow-and-ice-at-critical-details.jpg
- [Image]: https://www.constructioncanada.net/wp-content/uploads/2019/01/windchillchart.jpg
- [Image]: https://www.constructioncanada.net/wp-content/uploads/2019/01/daylight-graph.jpg
- [Image]: https://www.constructioncanada.net/wp-content/uploads/2019/01/Ted-Katsoris.jpg
- tkatsoris@morrisonhershfield.com: mailto:tkatsoris@morrisonhershfield.com
- [Image]: https://www.constructioncanada.net/wp-content/uploads/2019/01/Derrick-Moore.jpg
- dmoore@morrisonhershfield.com: mailto:dmoore@morrisonhershfield.com
Source URL: https://www.constructioncanada.net/the-challenges-of-winter-roofing/