Lessons learned in masonry
by Elaina Adams | September 1, 2012 10:37 am
 [1]
[1]By David Sovinski
Specifiers, architects, engineers, contractors, installers, and craftworkers all have something valuable to offer to the conversation when it comes to creating high-performing building enclosures.
While people have to be sensitive to contractual relationships, they should also strive to create an environment that encourages open dialogue between all parties. For example, although a masonry installer may have a contractual relationship with a construction manager, there is great value in communication between the subcontractor and architect to discuss expectations, concerns, and creative alternatives based on field experience. Of course, any changes to the scope of work, construction process, or other significant issues should work through the contractual relationship, but a project may suffer without informal conversations.
The International Masonry Institute (IMI) provides services to contractors, designers, owners, and craftworkers through apprenticeship and training, marketing, technical services, continuing education, and research/development. Its masonry hotline connects designers and builders with the nearest service office in North America. The team of technical experts can discuss everything from performance and material section to design options and lifecycle cost. Over the years, and after thousands of calls, IMI has collected a series of tips and best practices. These not-so-secret paths to success may often seem simple, but they cause the large majority of problems in masonry buildings.
This article is not meant to be an exhaustive discussion on any single item, but rather an overview of the most common questions, problems, and barriers to a high-performing masonry structure.
The most common lessons learned fall into these categories:
- ‘systems’ thinking;
- understanding material properties;
- system interfaces;
- moisture, air, and vapour control;
- cost control;
- movement control;
- stains and cleaning;
- communication; and
- workmanship.
 [2]
[2]Photo © Serenia Holland. Photo courtesy IMI
 [3]
[3]Photo © Tom Nagy
‘Systems’ thinking
Since a change in a single component of the entire building enclosure system can affect the whole system’s performance, any alteration in material or detailing should be evaluated in light of how it alters the greater whole. For example, a seemingly simple change of a weep vent for cost reasons may profoundly impact the wall’s function and esthetics. The road to poor performance is often paved with good intentions.
There is the erroneous belief if a little insulation is good, then a lot of it must be better. Leaving aside the argument of diminishing marginal return on increased cost, a side effect of additional insulation is potentially shifting the dewpoint, minimizing air space, or requiring a different veneer tie system.
Changing the veneer material due to esthetics, cost, or other reasons can also pose problems. On a recent project, the architect decided to replace the clay brick veneer units with concrete masonry units (CMUs). While both options are acceptable choices and perform well at a fair price, concrete blocks have different characteristics than clay masonry, and the movement control strategy must also change. Clay masonry expands with both thermal and moisture expansion; CMUs, on the other hand, tend to shrink due to losing moisture. When the original details for movement control were left unchanged, the veneer experienced cracking.
 [4]
[4]Photo © Dave Collins
 [5]
[5]Photos © Pat Conway
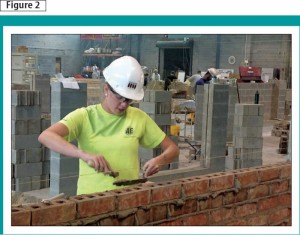
Where two trades meet, one should take special care both parties understand the details for how they connect or relate. Since an enclosure is a single working system, one should think about using a single source for the installation. A good example is the low-roof/tall-wall detail. In Figure 1, the mason and roofer both installed their products, but water was trapped below the level of the drainage vent or weep. IMI recommends a site meeting with all parties before installation of this critical detail.
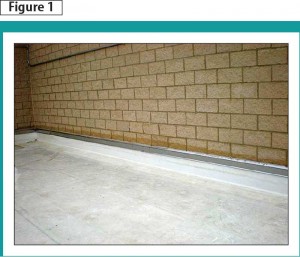
A wall section includes installation of the control layers of moisture, air, and vapour barriers, thermal insulation, and the masonry ties. If a single trade installs all these items, one minimizes scaffolding needs and the scheduling issues with trade co-ordination. Also, one trade is responsible for patching or repair of the control layers during the construction phase. IMI trains members of the International Union of Bricklayers and Allied Craftworkers (BAC) in all these building enclosure items (Figure 2).
Material properties
It is critical to take the time to read the appropriate standards for the materials chosen and specified. An issue that repeatedly comes up is the dimensional tolerance for brick. According to Canadian Standards Association (CSA) A82-06, Fired Masonry Brick Made from Clay or Shale, Table 3, the maximum permissible variation from specified dimension is 8 mm (0.3 in.) for a brick specified between 200 and 300 mm (7.9 and 11.8 in.).
 [6]
[6]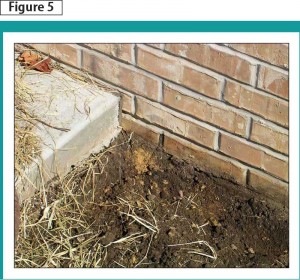 [7]
[7]There are further requirements for the average brick in the job lot sample, but the point is to remember brick, or clay masonry, has a material tolerance. When examining a wall, it is important to remember while a bricklayer tries to keep head joints in alignment, there may be some acceptable variance due to material properties.
If a designer references a standard in job specifications, the material must demonstrate its compliance. One should ensure he or she knows the requirements of such standards.
Watch the interfaces
A vice-president of field operations for a major construction manager recently had some valuable input for the building envelope.
“The biggest place a subcontractor can help the performance is to watch the gaps,” he told this author. “When two trades have work that meets, who is responsible for the gap? If a window meets a brick wall, and each trade has a given tolerance, I need assurance the size of the sealant joint is going to meet design. I don’t need finger-pointing and a fight between trades.”
This common complaint applies to material tolerances, trade jurisdiction, and, most importantly, good communication between all parties.
It is IMI’s contention brick does not leak. However, water enters a masonry wall system through the interface of masonry and a dissimilar material. Mortar joints, cracks, window jambs, sills, and heads are all potential sources of problems where one material interfaces with another, and all take special attention from the parties involved. One should watch the interface.
 [8]
[8]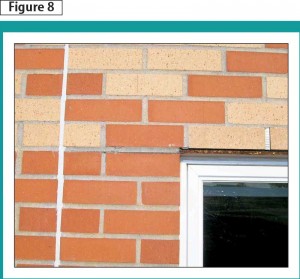 [9]
[9]Control the moisture
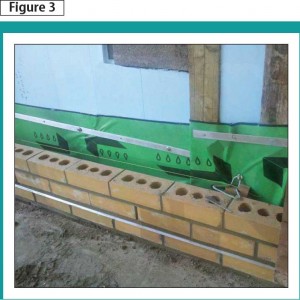
Moisture penetration is the enemy of a good building enclosure. From a craft standpoint, the first line of defence against water penetration with unit masonry is good workmanship. Full head and bed joints are critical––particularly the vertical head joint since it does not have the wall’s dead load to help compress the mortar for a more dense mortar joint (Figure 3).
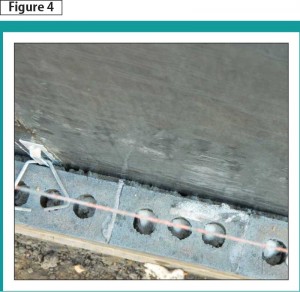
In cavity wall construction, one should ensure the air space is wide enough. IMI recommends a 51-mm (2-in.) clear space for ventilation and drainage. Smaller air spaces can lead to mortar bridging and tapered air spaces in the case of support walls being slightly out of tolerance (Figure 4).
One should ensure flashing extends past the face of the wall. It is best practice from a functional and esthetic perspective to have the flashing extend out of the wall with a metal drip edge. It is also important to ensure flashing is properly installed to prevent oozing of heat-unstable membranes.
Inserting below-grade weeps allows drainage above grade––another example of trade co-ordination (Figure 5). This author knows of a project where the landscaper put the grade higher than the weeps. A similar problem occurs when a maintenance person, in good faith, decides to put a sealant joint over all of those weeps, thinking they are simply voids a bricklayer forgot to fill with mortar.
One should also check all applicable codes and standards, and ensure specifications are carried out in the field. Figure 6 shows a nylon rope wick in place of the specified open vent.
 [10]
[10]Photo © Pat Conway
 [11]
[11]Photo © David Sovinski
Control the air
Uncontrolled airflow has many major consequences, including energy loss through heated air moving through the enclosure and moisture travelling with the airflow. The air barrier must be continuous. Common problems include the area above the suspended ceiling—again, a location where two trades interface.
One should seal all holes in an air barrier. Even a small opening can allow large amounts of moisture to be transferred where no one wants it. A study by the National Research Council Institute for Research in Construction (NRC-IRC) showed air leakage can transfer more than 2000 times the amount of moisture as vapour diffusion alone. (For more information, see National Research Council of Canada (NRC), Division of Building Research, “Building Practice Note No. 54: The Difference Between a Vapour Barrier and an Air Barrier,” by R.L. Quirouette).
Control costs
A cynic might say value engineering is a misnomer, since it often does not bring value and is it not engineering. However, while it is sometimes true what people call ‘value engineering’ simply becomes an exercise in cost-cutting, there are some good cost-to-benefit choices one can make in the masonry enclosure that offer true value at a much lower price.
For example, one should look at modular design. Ensuring the door and window openings occur on a modular scale reduces the need for costly cutting and associated esthetic issues. Lifecycle-costing tools should also be employed. Initial material or system expenses are often overshadowed by future maintenance prices and frequent replacement versus a more durable material.
Masonry cracks
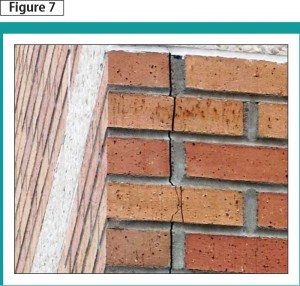
Masonry movement is largely due to two factors: moisture and thermal movement. To help prevent this, one should know the vocabulary. Clay masonry tends to grow, so expansion joints are installed to allow for this movement. Concrete masonry experiences moisture shrinkage, so control joints are also installed to allow for this movement.
One should keep an expansion joint fairly near a corner for performance needs; a good place for a vertical movement joint is the corner side of a close window or door. If one does not provide a joint, nature and physics will simply create one (Figure 7).
 [12]
[12]Photo © David Sovinski
 [13]
[13]Photo © Pat Conway
If using a steel lintel over a window, mortar should not be used at this joint. Instead, a sealant should be employed since the steel has different movement characteristics and also tends to move due to the load of the brick above (Figure 8).
According to CSA A371-04, Masonry Construction for Buildings, the movement joint location and details are to be specified in the contract documents. One should not ask the mason contractor to locate movement joints––it is not his or her responsibility and he or she may not have enough information to make an informed decision.
Stains and cleaning
By far the most common ‘stain’ is efflorescence. To be precise, this is not technically a stain, but rather the occurrence of soluble salts on the masonry’s surface. The mechanism is fairly well understood, but not always prevented. When moisture enters a masonry assembly, it dissolves soluble salts from the brick, mortar, or other construction sources. One can spend a lot of time and money testing the salt source, but it is generally easier to reduce or eliminate the water penetration and/or increase the masonry’s drying capacity. As this moisture migrates to the masonry’s surface through capillary action, the salts migrate along for the ride. When the moisture evaporates, salts stay behind, visible on the masonry’s surface.
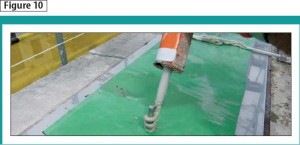
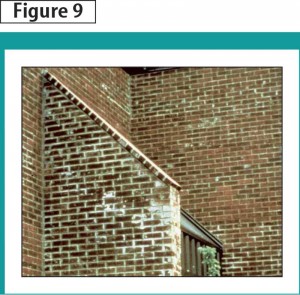
One should use great care with brick rowlock caps. In the case illustrated in Figure 9, even a sloped wall did not stop the water penetration. Instead, one should think of a limestone or precast concrete cap. To further complicate the problem in this circumstance, there was no through-wall flashing beneath. Even with an appropriate cap, one should use through-wall flashing and take care of the final detail by sealing the anchor penetration (Figure 10). Figure 11 shows airborne moisture escaping through an area with a missing air barrier.
Over time, when salts accumulate beneath the masonry’s surface, or subflorescence, they may grow and cause spalling of the masonry surface.
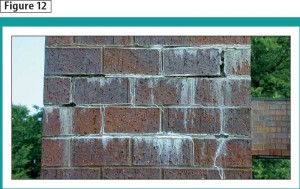
A second stain is a lime run, or calcium carbonate (Figure 12). It appears as a harder substance on the face of masonry, and is caused by repeated moisture flow through a masonry assembly. There must be large amounts of water through masonry for this to occur. This is more difficult to clean, and requires a proprietary cleaner. One should always test on a portion of the building less visible before extensive cleaning. The simple solution is to always find the source of moisture penetration and solve that before cleaning.
 [14]
[14]Photos © Pat Conway
 [15]
[15]Photo © David Sovinski
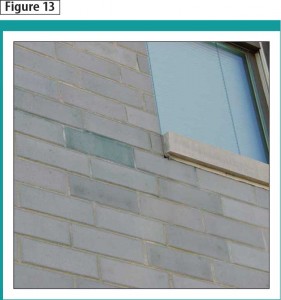
Improper cleaning techniques are numerous, but there is one that stands out. Product labels must be read and the manufacturer’s directions followed. If the products are not diluted as directed, or the substrate is not properly treated, then one often sees the product react with the minerals in the masonry, resulting in vanadium or manganese stains (Figure 13).
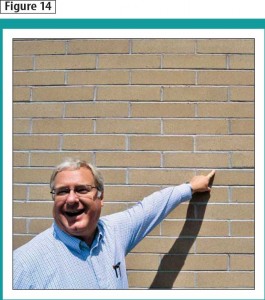
While it is not a stain, one often wonders why mortar joints do not cure at the same colour. This is often due to inconsistent tooling (Figure 14). Mortar joints should be cured when ‘thumbprint hard.’ If done at inconsistent intervals, the mortar cures at a different colour.
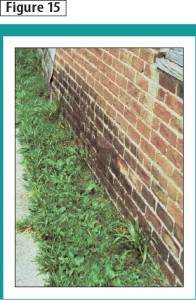
One function of flashing at the brick ledge, or base course, is to prevent rising damp (Figure 15). The rising moisture carries other impurities––in this case, the soil itself.
Communication
During a project’s material selection phase, trade associations such as IMI, material suppliers, or any friends at professional associations can all offer feedback on how materials should be used and detailed. Compatibility issues can be explored and much more.
At the pre-job meetings, one should ensure he or she is very clear on expectations. This is the time to explain what the details on the drawings mean in an unambiguous manner.
 [16]
[16]Sample panels are critical. While one tries to communicate his or her expectations in meetings, in specifications, and on drawings, the potential for expensive conflict remains. A mutually agreed on sample panel showing not only the range of material properties, but also workmanship, is vital. If a contractor bids a project with one set of expectations, and a designer has another set of expectations in mind, this sets the stage for disaster. One should explain to the contractor the workmanship on the panel he or she expects for the project as a whole.
Sample panels should not be destroyed until one is completely sure the project is accepted. On a recent project, the sample panel prematurely found its way into the dumpster. Changes in supervisory personnel further complicated the process, and the result was expensive litigation. Keeping the sample panel would have allowed all parties to simply compare the panel to actual construction.
Conclusion
The Canadian construction industry has experienced many rapid, dramatic changes in design, delivery, and performance requirements in the last few years, and can only expect to see accelerated change in the future.
Through all of this, the constant theme of the change is performance-based design, looking at the performance of the entire enclosure as a single entity. The lessons that are learned in this article are just the tip of the iceberg in maintaining a high-performing, cost-effective building enclosure.
David Sovinski is International Masonry Institute’s (IMI’s) national director of industry development. IMI represents an alliance between the International Union of Bricklayers and Allied Craftworkers (BAC) and union masonry contractors. His experience includes masonry project manager, estimator, and architecture and technology teacher at Indiana University Purdue University Indianapolis (IUPUI). Sovinski has a degree in construction management from Purdue University. He can be contacted via e-mail at dsovinski@imiweb.org.
- [Image]: https://www.constructioncanada.net/wp-content/uploads/2015/11/Terr-1.jpg
- [Image]: https://www.constructioncanada.net/wp-content/uploads/2015/11/2.jpg
- [Image]: https://www.constructioncanada.net/wp-content/uploads/2015/11/1.jpg
- [Image]: https://www.constructioncanada.net/wp-content/uploads/2015/11/3.jpg
- [Image]: https://www.constructioncanada.net/wp-content/uploads/2015/11/4.jpg
- [Image]: https://www.constructioncanada.net/wp-content/uploads/2012/09/6.jpg
- [Image]: https://www.constructioncanada.net/wp-content/uploads/2015/11/5.jpg
- [Image]: https://www.constructioncanada.net/wp-content/uploads/2012/09/7.jpg
- [Image]: https://www.constructioncanada.net/wp-content/uploads/2012/09/8.jpg
- [Image]: https://www.constructioncanada.net/wp-content/uploads/2012/09/10.jpg
- [Image]: https://www.constructioncanada.net/wp-content/uploads/2012/09/9.jpg
- [Image]: https://www.constructioncanada.net/wp-content/uploads/2012/09/11.jpg
- [Image]: https://www.constructioncanada.net/wp-content/uploads/2012/09/12.jpg
- [Image]: https://www.constructioncanada.net/wp-content/uploads/2012/09/14.jpg
- [Image]: https://www.constructioncanada.net/wp-content/uploads/2012/09/13.jpg
- [Image]: https://www.constructioncanada.net/wp-content/uploads/2012/09/15.jpg
Source URL: https://www.constructioncanada.net/lessons-learned-in-masonry/