Concrete flooring: Mitigating vapour-related failures
by brittney_cutler_2 | May 23, 2022 2:00 pm
 [1]
[1]By Heather (Yario) Rice
Whether for new construction or renovation, proper subfloor preparation is essential for executing a high-quality floor installation while extending the life of the finish flooring. In the last 20 to 30 years, regulations on volatile organic compounds (VOCs) have made buildings safer for occupants; however, these regulations have also created new challenges for designers and general contractors, as in the case of moisture vapour-related flooring failures.
As the industry’s understanding of moisture emissions has grown, so have the types of solutions to mitigate the problem. Today, a new category of moisture barriers makes it easier and more cost-effective than ever to properly prepare concrete for finish flooring.
On July 2, 2003, ozone and its precursors, including VOCs, were added to Schedule 1 of the Canadian Environmental Protection Act, 1999 (CEPA 1999). This provided Environment Canada with additional tools and the legal authority to develop and propose measures to control VOC emissions. Since then, Environment Canada has continued to review and update its regulations on VOCs. On May 2, 2015, a proposed order to amend the definition of VOCs as listed in Schedule 1 of CEPA 1999 was published in the Canada Gazette, Part I[2]. Removing solvents from adhesives made them VOC compliant; however, the resulting products were sensitive to moisture vapour in a way the industry has not seen before.
 [3]
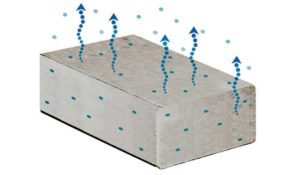
[3]In the author’s observations, prior to the adoption of VOC regulations, moisture-related failures were largely unheard of. They noticed flooring failures began to occur with frequency in the early 2000s. The flooring industry quickly learned moisture vapour emissions were to blame. Not only were these types of emissions common, but they could also result from a wide variety of sources. Slabs, especially on grade, can vary in moisture content and emission levels. From groundwater intrusion to major weather events, the amount of moisture present could vary throughout a slab, increasing and decreasing seasonally and throughout the life of the building. Slabs that tested with low moisture emissions could still have a failure weeks, months, or years down the road.
Common construction practices also held the potential to cause moisture-related issues. The process of burning or hard trowelling a slab was used to achieve floor flatness but had the secondary effect of sealing the surface. Applying a cure-and-seal expedited the curing process and sealed the surface to protect it from trade damage. When it came time to install flooring, manufacturers would require the surface of the slab to be opened to remove bond breakers.
Since both processes trapped moisture in the slab, opening the surface allowed water vapour to exit as the relative humidity (RH) of the slab sought equilibrium with the ambient conditions on the jobsite. Not only did this cause condensation to form at the bond of the adhesive to the slab, but it also could pull alkalinity from within the slab to the surface, creating a high pH environment. Standard adhesives could handle a pH of up to nine, while a freshly opened slab could easily reach a pH of 11 in a short timeframe.
Below the flooring, one of two things would happen: either the adhesive would not dry or adhesive that was dry when the flooring was installed would emulsify. This is where mould, mildew, and other aggravating floor failures would start. As with any emerging issue, preliminary testing and solutions needed to be developed before improvement was possible.
 [4]
[4]Testing methods and their shortcomings
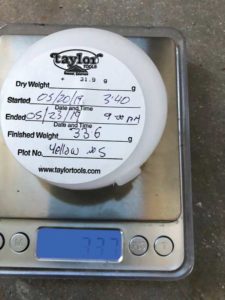
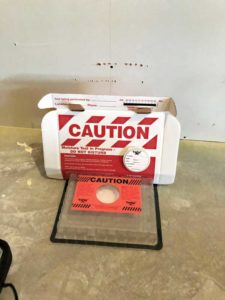
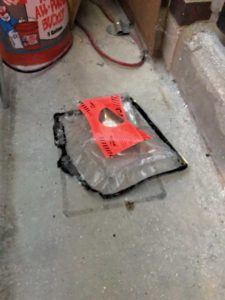
The original method used to test for moisture vapour emissions was ASTM F1869, Standard Test Method for Measuring Moisture Vapor Emission Rate of Concrete Subfloor Using Anhydrous Calcium Chloride (CaCl). The CaCl test was performed on a mechanically prepared, porous surface. A petri dish containing CaCl salt crystals would be weighed and recorded, then placed on the prepared floor and sealed with a 609 x 609 mm (18 x 18 in.) housing unit. After 72 hours (newer versions of the test have reduced the waiting time to 24 to 72 hours), the petri dish was weighed again, and the moisture vapour emissions rate (MVER) was calculated using the change in mass for a given area over 72 hours. The resulting MVER was reported in pounds per 93 m2 (1000 sf) for a 24-hour period. It was this test that all flooring manufacturers initially adopted into their literature; the typical standard with a reading in excess of 1.4 kg (3 lb) to 2.3 kg (5 lb) per 93 m2 per 24 hours would require a moisture mitigation system.
As flooring contractors started realizing testing was the only way to prevent floor failures from coming back to haunt them, testing began to ramp up. The problem was the test was rarely performed to the standard, falsely signalling moisture emissions as being less of a problem than they were. Early testing, dependent on the project, was performed by flooring installers and general contractors, well-intentioned but untrained in the technical nuance of moisture vapour emissions and the method. ASTM F1869 required the units be placed at a frequency of three units in the first 93 m2 area and one additional unit placed in every subsequent 93 m2 area. Once in place, the units were to be left undisturbed for the duration of the test. Rarely was an adequate number of units placed, and in many cases, there were grossly fewer than required (i.e. four units in a 4645.2 m2 [50,000-sf] project, instead of the required 52 units). On many early projects, the housing units were tampered with, damaged, or ignored, and were subject to construction traffic (e.g. rolled over with scissor lifts, etc.), which also led to inaccurate results. The resulting failures highlighted the importance of strict adherence to the testing method and led to the growth of third-party certified testing consultants, which has greatly improved confidence in results.
 [5]
[5]Then, something new happened. Floors that tested below flooring manufacturers’ specified emission rates were still experiencing failures that appeared to be related to moisture. How could this be? ASTM F1869 only revealed moisture issues in the top 6.35 mm (0.25 in.) of the concrete slab and did not account for local temperatures and humidity. It also told nothing about what was happening inside the slab. A vapour retarder helps for on grade. If penetrated, it could be a source of slab water, but moisture issues happen above grade as well.
What is going on inside the slab?
The need to understand what was happening deeper in the slab drove the creation of ASTM F2170, Standard Test Method for Determining Relative Humidity in Concrete Floor Slabs Using in situ Probes. ASTM F2170 measures the RH of a slab by drilling a hole to either 20 or 40 per cent of the concrete slab depth, sealing the hole for 72 hours to allow moisture equilibrium to be achieved, and then inserting a probe to measure the RH as a percentage. Most flooring manufacturers have adopted this method as an accepted alternative to ASTM F1869 and will require a moisture mitigation system for slabs with greater than 80 per cent RH. Using either method before flooring installation still did nothing to prevent changes in slab moisture from impacting the flooring.
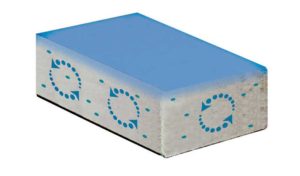
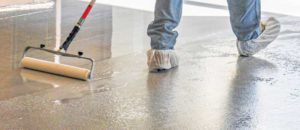
A reliable method for mitigating moisture emissions became widely adopted in the early 2000s. A membrane-forming two-part epoxy installed over the concrete was installed to block moisture vapour emissions. The process required the concrete slab be shotblast to an International Concrete Repair Institute (ICRI) concrete surface profile (CSP) of three to five, depending on the epoxy manufacturer’s guidelines. The opened slab would be left for 24 hours to allow off-gassing or pH changes to occur. The two parts of the epoxy were then blended, initiating the rolled in one or two coats. Following the epoxy installation, either sand was broadcast into the wet epoxy, or a primer was installed over the hardened epoxy to facilitate bonding with the underlayment cap or finish flooring material. The original cost of these systems was approximately $11 to $15 per square foot. Today, this system is installed for about $5 to $9 per square foot, which is still a costly prospect when many flooring finishes are around $1 to $2 per square foot.
 [6]
[6]Pre-emptive moisture mitigation
Pre-emptive moisture mitigation has become commonplace in hospital settings because a flooring failure resulting in downtime is far more costly than the price of moisture mitigation as an ‘insurance policy.’ While this practice is extremely effective, it has not been widely adopted across commercial construction because adding $5 to 9 per square foot to the overall budget is frequently not an option. Instead, contractors install the slab, wait as long as possible before testing it, then deal with the problem if testing reveals high vapour emissions or moisture content.
Therefore, moisture mitigation has had to evolve and improve. Owners were shocked to hear fixing their floors would cost more than the original floor finish installation. Floor prep and flooring manufacturers started releasing products which did not require mitigation or testing. While many of these products work, they do not address the underlying moisture, which will remain a concern for every future finish flooring change. When it comes to moisture, it is generally accepted across the industry that it is best to fix the source of the problem, thus floor prep manufacturers began exploring more cost-effective moisture mitigation technologies.
Sodium silicates hit the scene as a solution for moisture emissions about 10 years ago. Sodium silicates are added to the concrete at the batch plant or onsite as the concrete pour is happening. These products have worked in certain settings, but overall have had mediocre success due to potential bond issues. Many flooring manufacturers do not recommend them underneath products. As such, their warranties generally require the presence of someone onsite to make sure their product is installed properly to prevent a moisture or bond failure.
 [7]
[7]Single-component mitigation technology
Single-component mitigation technology has been an area of advancement driven by excessive cost associated with installing a two-part epoxy moisture mitigation system. While some of these products have proven to perform as well as two-part epoxies, there has been pushback from architects and general contractors who are looking to adhere to ASTM F3010, Standard Practice for Two-Component Resin Based Membrane Forming Moisture Mitigation Systems for Use Under Resilient Floor Coverings. ASTM committees create several different types of documents, such as testing methods or practices for the industry. Standard test methods are procedures that generate test results defined to provide a uniform method for collecting specific data. ASTM F3010 is often perceived as a standard test method; however, it is a standard practice, which is a set of instructions that does not generate a test result.
ASTM F3010 does reference ASTM E96, Standard Test Methods for Water Vapor Transmission of Materials. This standard test method is the key to ensuring a system can block moisture vapour emissions, and it is used across a variety of industries to test a broad range of products, including moisture mitigation systems, tape, food, and pharmaceutical packaging.
The major advantage of a one-component product is its price advantage. A one-component product can be installed for several dollars less per square foot than a two-part epoxy system. Single-component moisture barriers generally only require an open surface to be installed. Instead of an aggressive CSP of three to five, achieved through shotblasting, proper surface preparation can be achieved through the less intensive process of grinding. Single components are installed in two coats. However, the second coat also serves as the primer for the underlayment or flooring, which eliminates the need for an additional primer or sand broadcast. Because a single component is not activated by a chemical reaction, as with a two-part epoxy, the installation process is more forgiving.
 [8]
[8]Moving forward
With reliable, cost-effective moisture mitigation solutions now available, some general contractors are realizing the extent of the benefits a moisture mitigation system has on projects—primary of which is the opportunity to reduce the construction timeline. The drying process in concrete starts the day the building is enclosed, and the HVAC starts running. Until this happens, the slab is subject to water intrusion through weather conditions, water from other trades, etc. Once true drying site conditions are achieved, the concrete will dry at a rate of 25.4 mm (1 in.) per month, so a 203.2 mm (8 in.) slab will take eight months to dry in optimal conditions.By this standard, the slab should be fully dry by the time installation starts. By installing a moisture mitigation system over green concrete, contractors are no longer beholden to the moisture content of the slab when scheduling flooring installation.
Developers are buying into these solutions because of the reduction in risk they represent. A cost-effective moisture mitigation system helps to avoid major budget impacts, timeline delays, and the risk of litigation associated with unforeseen moisture problems. It is always easier to take care of a problem on the front end, as construction will not have to be stopped and the floor cleared to address the issue, which can take upwards of a week to resolve. The time impact alone pays for some newer one-component solutions.
 [9]
[9]Many products being developed in the floor finishing industry are not moisture sensitive. These are great alternatives, but as the problem is not addressed, the issue will need to be revisited if the floor covering is changed. Mould, mildew, finish and/or joint filler discolouration are also issues. With the introduction of reliable, affordable moisture mitigation solutions, it is possible to rethink the construction schedule and leverage a moisture barrier to reduce timelines and risk. Correcting the source of potential problems from the beginning may prove to be the best insurance policy money can buy.
Author
 [10]Heather (Yario) Rice has spent the last 18 years working in some capacity of floor prep and moisture mitigation. She has worked for two major flooring contractors and three large floor prep manufacturers, gaining extensive knowledge of moisture mitigation; Portland, hydraulic, and gypsum cements; as well as sound and fire ratings. Rice is a certified concrete moisture testing technician through the International Concrete Repair Institute (ICRI) and keeps up to date on the latest technologies and advancements.
- [Image]: https://www.constructioncanada.net/wp-content/uploads/2022/05/Concrete-Floor.jpg
- Canada Gazette, Part I: http://tbfenvironmental.com/vocmir-regulations/voc-and-mir-regulations-by-jurisdiction/environment-canada.
- [Image]: https://www.constructioncanada.net/wp-content/uploads/2022/05/Weights-before-and-after-the-Cacl-Test.jpg
- [Image]: https://www.constructioncanada.net/wp-content/uploads/2022/05/Dome-over-Cacl-Test.jpg
- [Image]: https://www.constructioncanada.net/wp-content/uploads/2022/05/Cacl-test-in-progress-on-jobsite.jpg
- [Image]: https://www.constructioncanada.net/wp-content/uploads/2022/05/Slab-Moisture-escape-v2.jpg
- [Image]: https://www.constructioncanada.net/wp-content/uploads/2022/05/Slab-Moisture-contained-v2.jpg
- [Image]: https://www.constructioncanada.net/wp-content/uploads/2022/05/Tramex-meter-for-RH-value-in-concrete-slab.jpg
- [Image]: https://www.constructioncanada.net/wp-content/uploads/2022/05/Moisture-Barrier-Maxxon-MVP-One-Primer.jpg
- [Image]: https://www.constructioncanada.net/wp-content/uploads/2022/05/Rice_Headshot.jpg
Source URL: https://www.constructioncanada.net/concrete-flooring-mitigating-vapour-related-failures/